Showing posts with label practice. Show all posts

Tuesday, 1 December 2015

Assessment Design and Practice

This was my partners final design idea that I would have to do on her for our assessment:


She wanted the front half of the head crimped and backcombed so that it would be really big at the front with one pinned in curl on each side of the head and then the rest of the hair curled at the bottom. Here are some images of my practice of my partners design.


I had to practice these designs at home due to the fact that my partner was ill for the technical sessions.

Thursday, 19 November 2015

Final Design Idea and Inspiration for Design

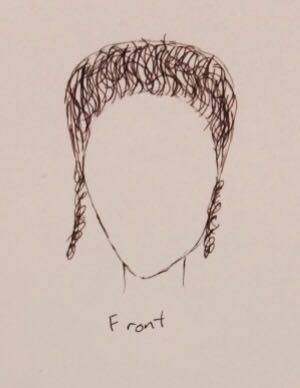
For my final design idea I decided on the heart shape for the front of the hair.


I sectioned off the front of the hair, crimped it and then backcombed it on both sides. I then twisted the hair on each side and pinned it into place. I thought about leaving two bits down on the sides to curl like in my previous design but decided against it as I wanted the style to look more contemporary and felt that this made it look a little old fashioned.


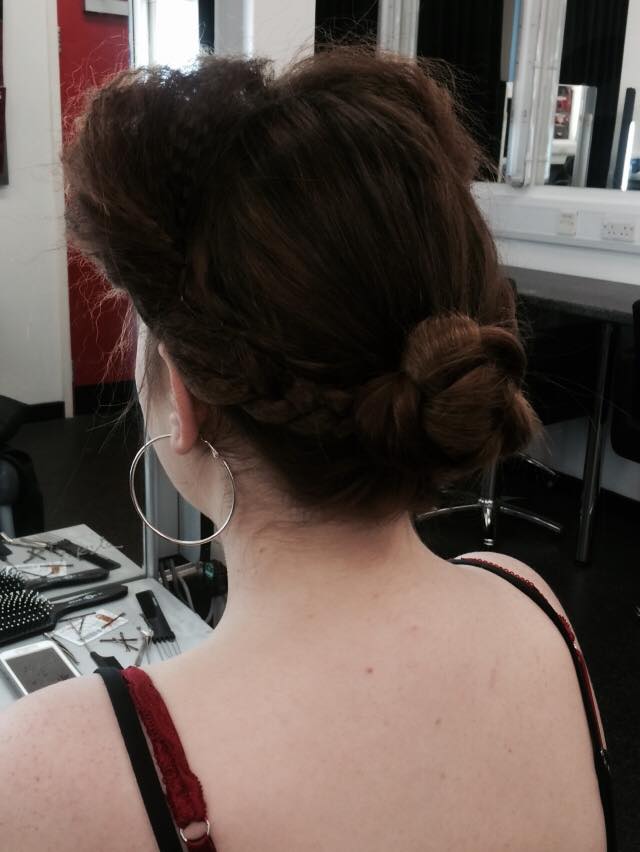
I then plaited the hair left at the back of the head, twisted and pinned into place.


 I also tried the style out with the bun on more towards on side but preferred the way it looked in the centre.

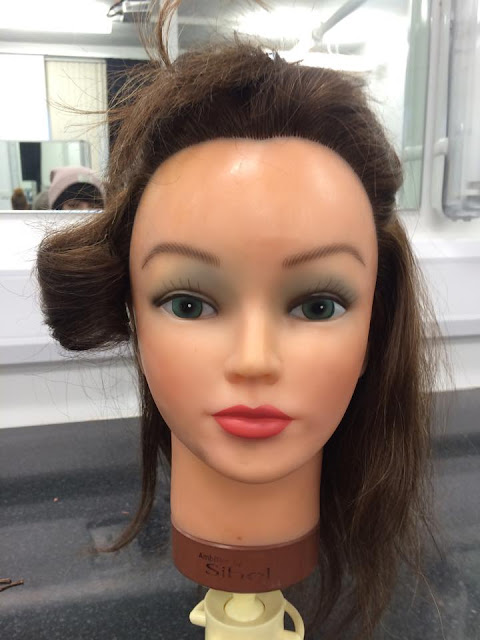
My design also differed on the Kate head as I have a fringe. Me and my partner decided for the final design idea that I would leave my fringe down to make the hairstyle look more contemporary and due to the fact that, as it is quite short, it was hard to disguise in the heart shape style.

My design as heavily inspired by Chanel's 2010 Spring/Summer catwalk as a lot of the models had big, heart-shaped hairstyles:


Above is a picture of the back of the hairstyle the first time my partner practiced it.


http://en.people.cn/mediafile/201001/27/P201001271418321715931744.jpg

http://media.onsugar.com/files/2010/01/04/2/192/1922153/656cd56d9a847401_Chanel-Haute-Couture-Spring-Summer-2010.jpg

Design Idea 2

For my second design I decided to do something that incorporated crimping and curling. I really liked the idea of big hair that had been crimped and backcombed and wanted to experiment with different shapes so designed a rounded hairstyle.


To do this I sectioned off the front of the hair and crimped it using crimpers. I then backcombed it using a pin tail comb but left two small sections above the ears. I pinned the hair into place at the back of the head to create the round shape. I the used curling tongs to curl the two sections of hair i left above the ears.


I then put the rest of the hair in a pony tail and put it in a twist bun, using kirby grips to pin it into place.


I really liked the volume that the crimping and backcombing gave to the hair and decided i would definitely use this in my final design. I did, however, prefer the heart shape that I had practiced in earlier sessions rather than a round hair style.

Design Idea 1

For my first design idea, I wanted to try something with buns on the sides of the head and a bun at the back.


 I started by sectioning off hair on both sides at the front of the head. I then plaited these and twisted them around into buns. I sectioned off more hair behind the buns and then french-plaited behind them and then brought the plaits back and tied them in a low ponytail with the rest of the hair.  I then created a twist bun with the hair in the pony tail.


After I tried out this design on the Kate head I decided that I did not want to use it for my final design. This was because i personally felt that it looked a bit boring and wanted to use crimping and back combing in my final design.

Technical File: Fashion/Catwalk Design

During this session we got to decide in pairs whether to design a contemporary hairstyle for either a wedding or a catwalk show that had Elizabethan elements. I decided to do the catwalk design. I wanted to do something that as quite big and dramatic so I crimped all of my partners hair using crimpers.


I then backcombed the hair at the front and pinned it in place to create a big heart shape. This worked well with her hair as it's black and red and added to the heart effect.


I decided to leave the rest of the hair down but backcombed a little bit and then backcombed the front of the hair more to give a messy effect. I really liked the outcome and would like to try it out again but make the front of the hair bigger. This is something that I would like to incorporate into my final hair design.


Wednesday, 21 October 2015

Technical File: First Attempt at an Elizabethan Hairstyle

Elizabethan Hairstyle

Prior to this session, we were told that we would be working on others in the class rather than our Kate heads for the first time and that we were to do an Elizabethan hairstyle that had to be curled or frizzy at the front with a bun at the back. For mine, I decided to go with a heart shape at the front of the head. To do this I sectioned off the hair at the front of the head and then crimped it, splitting the hair into a middle parting. I really liked the way this turned out as I felt that it did look very Elizabethan and I found it quite easy to do.

I then backcombed it in sections, twisted and then pushed it up and pinned it on each side to create the shape of the heart.  For the back of the hair I decided to do a plait bun so I put the hair up in a ponytail, plaited it and then twisted it and secured it in place by pinning it with Kirby grips.


As there was still hair that was crimped being pulled into the plait I decided to undo the bun and redo it as it looked a bit strange due the different textures of the hair with some of it being straight and some of it being crimped. I decided to plait the crimped pieces of hair and pull them back into the bun. I much preferred the way that this looked and I really enjoyed this session as it was different to work on another person and it was interesting to be able to come up with our own designs for a whole hairstyles.

Sunday, 18 October 2015

Technical File: Crimping

Crimping

In our next session, we worked on different ways of crimping the hair. For the first way, I used fine pins and wrapped small sections of hair around them, in a figure of eight motion. I then held the hair in place using Kirby grips until I’d finished using all of the sections of hair at the front of the head that I wanted to crimp. Then I held hair straighteners on each of the sections of hair before letting go and taking out all the pins. This created a crimped piece of hair that I decided to brush through to create frizzy hair at the front of the head, much like the Elizabethans would have. I personally preferred this method to using the crimper as I felt the crimps in the hair created a better frizz to the hair than the crimper did.


After this I crimped the hair using a crimper. This was done by sectioning off hair that wasn’t currently being used and taking smaller sections of hair to hold the crimper on down the length of the hair. I started at the nape of the neck and the underneath of the hair on the sides of the head first, before finishing at the top in a centre parting. After all the hair was crimped, I shook it out and then brushed through lightly with a paddle brush, like with the pins, to create a frizz through the hair. We were then told to create a heart shape hairstyle at the front of the head so tried out two different techniques to do this. For the first one I sectioned off part of the hair at the front of the head and then backcombed in smaller sections from the parting and down the side of the head. I then brought all the hair together, twisted it around and pinned it at the back of the section of hair to create the bun at the front of the head. For the other side of the head I used a rat (tights stuffed ith either tissue, fabric or cotton wool) and rolled it around a section of hair at the front of the head and then pinned it into place. Another was of doing this is to make a small french plait underneath where the rat will be placed and then to pin the rat into place using kirby grips and the plait. I personally preferred the side that had been backcombed as I found it a bit more difficult with the rat as it was difficult to disguise under the hair. I feel that if I were to do something similar for my assessment I would probably use backcombing. 


Technical File: Curls

Curls

During this session we focused on curls. I did two different types of curls on each side of the head using curling tongs. On one side I held the tongs vertically (spiral curls) and held in sections of hair for twelve seconds. I then removed the tongs and pinned the curls into place using Kirby grips to help them set. The other side was similar but I held the tongs horizontally (lift curls)  and then pinned them into place after the curl was created. After the whole head was done I took out all of the grips and shook the head to make them looser and lightly brushed them through with a paddle brush. I personally thought that the curls on the left side of the head (the spiral curls) looked better because there was more volume to them. I also found it easier to section the hair for these curls.


Next we moved onto brick work. This is a technique of sectioning the hair to get even curls, for example, one on top, then two underneath then three underneath that and then one underneath that.  I felt like this helped me when it came to sectioning as it’s something I struggle with.